Dye penetrant inspection (DPI), also called liquid penetrant inspection (LPI) or penetrant testing (PT), is a widely applied and low-cost inspection method used to check surface-breaking defects in all non-porous materials (metals, plastics, or ceramics). The penetrant may be applied to all non-ferrous materials and ferrous materials, although for ferrous components magnetic-particle inspection is often used instead for its subsurface detection capability. LPI is used to detect casting, forging and welding surface defects such as hairline cracks, surface porosity, leaks in new products, and fatigue cracks on in-service components.
Principles
DPI is based upon capillary action, where low surface tension fluid penetrates into clean and dry surface-breaking discontinuities. The penetrant may be applied to the test component by dipping, spraying, or brushing. After adequate penetration time has been allowed, the excess penetrant is removed and a developer is applied. The developer helps to draw penetrant out of the flaw so that an invisible indication becomes visible to the inspector. Inspection is performed under ultraviolet or white light, depending on the type of dye used – fluorescent or non-fluorescent (visible). Fluorescent penetrants are usually used when the maximum flaw sensitivity is required.
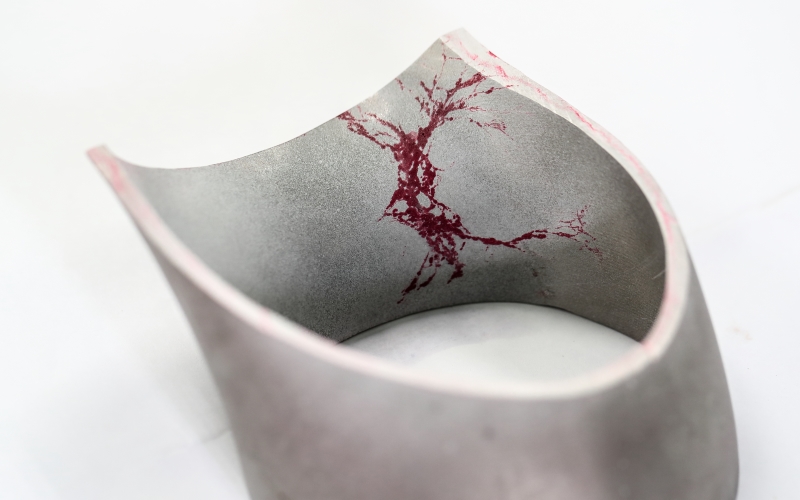
(Liquid penetrant test on a section of elbow to detect stress corrosion cracking)
Weld Inspection
The following is a generic step by step method for inspecting a stainless steel butt weld;
- Prepare/Pre-clean surface. Areas to be examined needs to be free of dirt, scale, grease, paint and any other foreign matter that would interfere with the interpretation of the test.
- As a pre-cursor to the DPI, a visual inspection of the test area is recommended.
- Apply penetrant to the test surface by means of spraying, dipping or brushing. The temperature of the surface object to be examined may not go below 16 degrees C and not above 52 degrees C during the performance of the examination.
- The appropriate penetration time depends on the properties of the penetrant, the application temperature, the material of the part to be tested. In general a 20 – 25 minute penetration time is sufficient. (penetration time is the total time of contact between the penetrant & test object).
- The excess penetrant shall be removed by washing with water (not exceeding 50 psi & 43 degrees C), and/or by using solvents with a lint free cloth. A combination of both can also be used.
- Excess penetrant removal check. Carry out a visual inspection to ensure all residual penetrant has been removed from the test piece.
- The test surface shall be dried as quickly as possible after excess penetrant removal using one of the following methods: wiping with a clean & dry lint free cloth, evaporation at elevated temperature, forced air circulation or a combination of all three. (the surface temp. must not exceed 50 degrees C during drying)
- The developer shall be applied by spraying uniformly. The spray shall form a thin, uniform layer on the test surface.
- The development time should be between 10 – 30 minutes, however longer times may be agreed between the contracting parties
- For inspection, the illuminance at the test surface shall be 500 lx or greater. Final inspection shall be carried out when the development time has elapsed. Inspection aids such as magnification instruments can be used.
- Post clean the test piece if required and remove all inspection materials, aerosol cans, rags etc. from work area.
Advantages / Disadvantages
The main advantages of DPI are the speed of the test and the low cost. Disadvantages include the detection of only surface flaws, skin irritation, and the inspection should be on a smooth clean surface where excessive penetrant can be removed prior to being developed. Conducting the test on rough surfaces, such as “as-welded” welds, will make it difficult to remove any excessive penetrant and could result in false indications. Water-washable penetrant should be considered here if no other option is available. Also, on certain surfaces, a great enough colour contrast cannot be achieved or the dye will stain the workpiece.
Limited training is required for the operator, although experience is quite valuable. Proper cleaning is necessary to assure that surface contaminants have been removed and any defects present are clean and dry. Some cleaning methods have been shown to be detrimental to test sensitivity, so acid etching to remove metal smearing and re-open the defect may be necessary.
Penetrant inspection can only be applied on non-porous materials.
Source/Credit: Wikipedia_dye_penetrant_inspection & BINDT_DPI
Author: James Murphy, Operations Manger of IPEC Inspection Ltd.
