Hardness is a measure of the resistance to localized plastic deformation induced by either mechanical indentation or abrasion. In general, different materials differ in their hardness; for example hard metals such as titanium and beryllium are harder than soft metals such as sodium and metallic tin, or wood and common plastics. Macroscopic hardness is generally characterized by strong intermolecular bonds, but the behaviour of solid materials under force is complex; therefore, there are different measurements of hardness: scratch hardness, indentation hardness, and rebound hardness.
Hardness is dependent on ductility, elastic stiffness, plasticity, strain, strength, toughness, viscoelasticity, and viscosity. There are three main types of hardness measurements: scratch, indentation, and rebound. Within each of these classes of measurement there are individual measurement scales. For practical reasons conversion tables are used to convert between one scale and another.

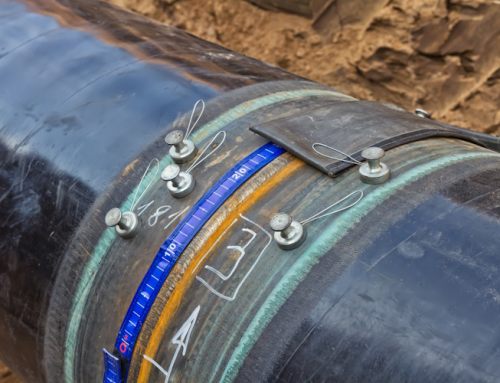
(Brinell Hardness Testing of an Alloy Pipe after PWHT)
Scratch hardness
Scratch hardness is the measure of how resistant a sample is to fracture or permanent plastic deformation due to friction from a sharp object. The principle is that an object made of a harder material will scratch an object made of a softer material. When testing coatings, scratch hardness refers to the force necessary to cut through the film to the substrate. The most common test is Mohs scale, which is used in mineralogy. One tool to make this measurement is the sclerometer.
Another tool used to make these tests is the pocket hardness tester. This tool consists of a scale arm with graduated markings attached to a four-wheeled carriage. A scratch tool with a sharp rim is mounted at a predetermined angle to the testing surface. In order to use it a weight of known mass is added to the scale arm at one of the graduated markings, the tool is then drawn across the test surface. The use of the weight and markings allows a known pressure to be applied without the need for complicated machinery.
Indentation hardness
Indentation hardness measures the resistance of a sample to material deformation due to a constant compression load from a sharp object. Tests for indentation hardness are primarily used in engineering and metallurgy fields. The tests work on the basic premise of measuring the critical dimensions of an indentation left by a specifically dimensioned and loaded indenter.
Common indentation hardness scales are Rockwell, Vickers, UCI, and Brinell, amongst others.
Rebound hardness
Rebound hardness, also known as dynamic hardness, measures the height of the “bounce” of a diamond-tipped hammer dropped from a fixed height onto a material. This type of hardness is related to elasticity. The device used to take this measurement is known as a scleroscope. Two scales that measures rebound hardness are the Leeb rebound hardness test and Bennett hardness scale.
Ultrasonic Contact Impedance (UCI) method determines hardness by measuring the frequency of an oscillating rod. The rod consists of a metal shaft with vibrating element and a pyramid-shaped diamond mounted on one end.
1) Rockwell Hardness Testing
The Rockwell scale is a hardness scale based on indentation hardness of a material. The Rockwell test measuring the depth of penetration of an indenter under a large load (major load) compared to the penetration made by a preload (minor load). There are different scales, denoted by a single letter, that use different loads or indenters. The result is a dimensionless number noted as HRA, HRB, HRC, etc., where the last letter is the respective Rockwell scale. When testing metals, indentation hardness correlates linearly with tensile strength.
Operation
The determination of the Rockwell hardness of a material involves the application of a minor load followed by a major load. The minor load establishes the zero position. The major load is applied, then removed while still maintaining the minor load. The depth of penetration from the zero datum is measured from a dial, on which a harder material gives a lower measure. That is, the penetration depth and hardness are inversely proportional. The chief advantage of Rockwell hardness is its ability to display hardness values directly, thus obviating tedious calculations involved in other hardness measurement techniques.
The equation for Rockwell Hardness is HR = N – d/s where d is the depth (from the zero load point), and N and s are scale factors that depend on the scale of the test being used (see following section).
It is typically used in engineering and metallurgy. Its commercial popularity arises from its speed, reliability, robustness, resolution and small area of indentation.
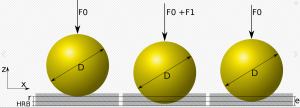
(Schematic of a Rockwell Hardness Test)
2) Vickers Hardness Testing
The Vickers test is often easier to use than other hardness tests since the required calculations are independent of the size of the indenter, and the indenter can be used for all materials irrespective of hardness. The basic principle, as with all common measures of hardness, is to observe a material’s ability to resist plastic deformation from a standard source. The Vickers test can be used for all metals and has one of the widest scales among hardness tests. The unit of hardness given by the test is known as the Vickers Pyramid Number (HV) or Diamond Pyramid Hardness (DPH). The hardness number can be converted into units of pascals, but should not be confused with pressure, which uses the same units. The hardness number is determined by the load over the surface area of the indentation and not the area normal to the force, and is therefore not pressure.
Implementation
It was decided that the indenter shape should be capable of producing geometrically similar impressions, irrespective of size; the impression should have well-defined points of measurement; and the indenter should have high resistance to self-deformation. A diamond in the form of a square-based pyramid satisfied these conditions. It had been established that the ideal size of a Brinell impression was 3⁄8 of the ball diameter. The HV number is then determined by the ratio F/A, where F is the force applied to the diamond in kilograms-force and A is the surface area of the resulting indentation in square millimetres.
Vickers hardness numbers are reported as xxxHVyy, e.g. 440HV30, or xxxHVyy/zz if duration of force differs from 10 s to 15 s, e.g. 440HV30/20, where:
440 is the hardness number,
HV gives the hardness scale (Vickers),
30 indicates the load used in kgf.
20 indicates the loading time if it differs from 10 s to 15 s
Vickers Hardness Values
316L stainless steel 140HV30
347L stainless steel 180HV30
Carbon steel 55–120HV5
Iron 30–80HV5
Martensite 1000HV
Diamond 10000HV
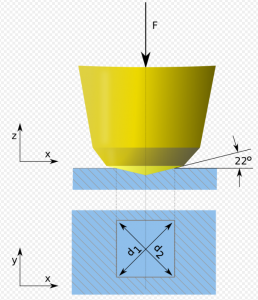
(Schematic of a Vickers Hardness Test)
3) Brinell Hardness Testing
The Brinell scale characterizes the indentation hardness of materials through the scale of penetration of an indenter, loaded on a material test-piece. It is one of several definitions of hardness in materials science.
Test details
The typical test uses a 10 mm diameter steel ball as an indenter with a 3,000 kgf (29.42 kN; 6,614 lbf) force. For softer materials, a smaller force is used; for harder materials, a tungsten carbide ball is substituted for the steel ball. The indentation is measured and hardness calculated as:
where:
BHN = Brinell Hardness Number (kgf/mm2)
P = applied load in kilogram-force (kgf)
D = diameter of indenter (mm)
d = diameter of indentation (mm)
Brinell hardness is sometimes quoted in megapascals; the Brinell hardness number is multiplied by the acceleration due to gravity, 9.80665 m/s2, to convert it to megapascals.
The BHN can be converted into the ultimate tensile strength (UTS), although the relationship is dependent on the material, and therefore determined empirically. The relationship is based on Meyer’s index (n) from Meyer’s law. If Meyer’s index is less than 2.2 then the ratio of UTS to BHN is 0.36. If Meyer’s index is greater than 2.2, then the ratio increases.[1]
Common Values
When quoting a Brinell hardness number (BHN or more commonly HB), the conditions of the test used to obtain the number must be specified. (HB is not related to the “HB” degree of pencil hardness.) The standard format for specifying tests can be seen in the example “HBW 10/3000”. “HBW” means that a tungsten carbide ball indenter was used, as opposed to “HBS”, which means a hardened steel ball. The “10” is the ball diameter in millimetres. The “3000” is the force in kilograms force.
The hardness may also be shown as XXX HB YYD2. The XXX is the force to apply (in kgf) on a material of type YY (5 for aluminium alloys, 10 for copper alloys, 30 for steels). Thus a typical steel hardness could be written: 250 HB 30D2. It could be a maximum or a minimum.
Brinell Hardness Values
Softwood (e.g., pine) 1.6 HBS 10/100
Hardwood 2.6–7.0 HBS 10/100
Lead 5.0 HB (pure lead; alloyed lead typically can range from 5.0 HB to values in excess of 22.0 HB)
Pure Aluminium 15 HB
Copper 35 HB
Hardened AW-6060 Aluminium 75 HB
Mild steel 120 HB
18–8 (304) stainless steel annealed 200 HB
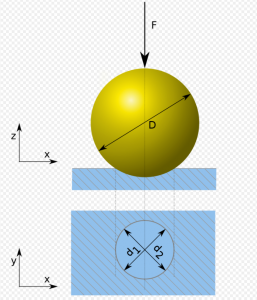
(Schematic of a Brinell Hardness Test)
Source/Credit: Wikipedia/Hardness, Rockwell Hardness, Vickers Hardness & Brinell Hardness
Author: James Murphy, Operations Manger of IPEC Inspection Ltd.


